This English quick guide is based on the Korean catalog. Confirm model-specific compatibility and installation details on the manufacturer’s official page.
Download MG5750 driver
Windows scan security update. Canon reports that IJ Scan Utility for Windows versions 1.1.2 through 1.5.0 can allow a local attacker to run a malicious file with the Windows service’s privileges (CVE-2026-1585). Canon Europe lists MG5700 series MP Drivers 1.02 as the fixed package for the MG5750. Install the latest MP Driver for the model from your regional Canon support site, then verify that IJ Scan Utility is 1.6.0 or later. Canon security advisory · MG5750 entry in Canon’s model list (PDF)
- Match the full model number on the device label, including suffixes.
- Check your operating-system version and architecture on the official support page.
- Cancel pending print jobs before replacing an existing driver.
- Follow the manufacturer’s instructions for power, USB, and network connections.
Model and driver source
This guide is for the colour inkjet print/copy/flatbed-scan multifunction printer with automatic duplex, hi-speed usb b and 2.4 ghz ieee802.11b/g/n wireless lan; exact mg5750/mg5751 appear in the official specification table, with no ethernet/fax/adf inferred model Canon MG5750. The download button opens the official Canon support page in this window. The manufacturer’s page is authoritative for the available driver packages and their current compatibility.
Operating-system and download checks
The Korean catalog lists these systems for checking: Canon UK exact-model pages and Applicable Models explicitly associate MG5700 series MP Drivers 1.02, released 2026-02-18, 78 MB, m68n-win-mg5700-1_02-ea34_2.exe, including IJ Scan Utility. Actual System Requirements: Windows 11; Windows 10/8.1/8/7 32/64-bit; Vista SP2 or later 32/64-bit; XP SP3 or later. Generic OS menus, security-patch Server lists, old Full packages and old Mac specs do not prove this MP supports ARM, Server, Linux or current Mac; inspect separate actual files and regional terms.. Select your exact operating system and version on the official page. If your version is not offered, do not install a package intended for a different system.
Connection and installation
- Check exact model, OS/CPU, rights, ink/paper/power/data cable; preserve queues/jobs/SSID.
- The compatible official MP EXE decompresses and starts installation automatically. Select USB in its actual screens and follow connection requests. Cancelling/unplugging on the waiting-for-connection screen requires MP reinstallation, not reconnection alone. Check real MG5700 queue/USB port/paper; test print and scan separately; restart only if prompted.
- Exact-model Wi-Fi & Setup / Connecting to a network directs users to compatible Drivers and Manuals / MG5700 series Getting Started (software installation part). Prepare the real approved same LAN, 2.4 GHz SSID/key; select network connection following that model guide/current installer and verify the real detected device. Do not copy another region's button sequence or disable all firewalls.
- Ethernet instructions do not apply. Old CD screens are not guaranteed to match current MP.
Mac printer driver download: print and scan are separate
Checked 15 October 2026: the MG5750 list with macOS 13 selected offers these two files. Their individual requirements differ, and each official detail associates the file with PIXMA MG5750.
| Official file / purpose | Version / release / listed size | File-specific macOS requirements |
|---|---|---|
| MG5700 CUPS printer driver Printing | 16.90.1.0 2024-12-16 17 MB | 15, 14, 13, 12, 11 |
| ICA scanner driver Scanning | 5.0.1 2024-10-11 3 MB | 15, 14, 13 |
Match the file as well as its title: CUPS is mcpd-mac-mg5700-16_90_1_0-ea21_3.dmg; ICA is misd-mac-ijscanner15f-5_0_1-ea21_3.dmg. The macOS Tahoe 26 selection instead returned zero drivers and Canon’s selected-OS support warning. Menu presence is not evidence that either file supports 26. CPU-specific operation, other print protocols and actual installation remain untested here.
Mac scanning failures: the ICA notes say to avoid the combined 25 dpi / grayscale / Descreen-on setting. If an Image Capture error leaves Scan disabled, restart Image Capture; after switching users, re-establish the actual USB or network connection. USB notes include both launching IJ Scan Utility before push scanning and an OS-change warning that the device SCAN button is unavailable. Use scanning from the Mac for that warning; do not promise that reinstalling a print driver restores the button.
If the displayed CUPS version stays old after an overwrite, Canon describes removing and registering that driver’s queue again. Preserve its jobs/settings first and avoid deleting other printers. A working print queue does not verify the separate scanner. The existing eight code groups below retain their earlier manual verification date; no driver was downloaded or installed.
MG5750 not printing: device output, codes and connection
The exact MG5750 support page maps the MG5700 Windows manual and lists MG5750 under Applicable Models. Use the LCD support number, not an invented flash count. The eight selected code groups below are not the entire error catalog. Device tests can help separate paper/ink/quality faults from PC connection or software problems; a normal test alone does not prove a driver fault.
Print a nozzle check without a PC job
With power on, load one A4 or Letter plain sheet in the cassette and register that size and Plain paper on the LCD. Open the output tray. Use HOME → Setup → Maintenance → Print nozzle check pattern → Yes, pressing OK at the selections. Compare the black grid and colour bands: missing lines or white horizontal streaks need the quality route; a clean pattern does not need cleaning. Low ink can make the test unreliable. Nozzle check pp.187–188 · Read the pattern p.189
Eight selected support-code groups
| Code / symptom | Check or action | Guide |
|---|---|---|
| 1003 | No paper or failed feed: load the cassette correctly, align its marks, open output and use OK. | Cassette |
| 1300 | Output-slot jam: remove visible paper gently with both hands; follow the correct alternate path if trapped. | Jam path |
| 2110 / 2120 / 4103 | Check for a cassette mismatch, unfinished registration or unsupported print settings, respectively. | Steps for each paper code |
| 1660 | An ink tank is absent; install the required tank. | Ink installation |
| 1680 / 1681 | Wrong tank positions / more than one tank of the same colour; check each correct location. | Tank positions |
| 1688 | Ink has run out; replace the tank and close the operation panel. Continuing can damage the printer. | Ink out |
| 1700 | Absorber nearly full: OK can continue printing, but Canon repair is still required. | Repair |
| 5B00 | Printer error: the exact manual directs Canon repair, not a driver reinstall or counter-reset tool. | Service |
Eight practical cause checks
| Code / symptom | Check or action | Guide |
|---|---|---|
| No feed / paper-size message | Check cassette loading and actual size/type against LCD and job registration; distinguish1003 from2110. | Paper |
| Paper trapped at output | Read1300 and the actual jam location; do not force inaccessible paper. | Jam |
| Ink tank warning | Separate absence, position, duplicate colour and exhausted ink using the actual support number. | Ink |
| Blank / streaked / missing colour | Compare the nozzle pattern first; clean only when needed, then follow the documented escalation. | Quality |
| USB / Wi-Fi printer not found | Common checks: correct data cable/port or same approved LAN; compare actual LAN report and current queue. | Connection |
| Device pattern works, PC job fails | Common checks: selected MG5700/MG5750 queue, pause/first failed job, actual connection and compatible MP component. | MG5750 driver |
| Print works, PC or SCAN-button scan fails | Check IJ Scan Utility and selected scanner. Current MP precautions distinguish OS upgrade and network-to-USB changes. | Scanning |
| Persistent service code | Record the complete LCD number and request Canon repair for the documented condition. | Service |
Cassette loading and registration are separate checks
For1003, close the output tray to load the cassette, push the stack to its indicated end, align the cassette/printer marks, reopen output and press OK. For2110, compare the actual paper with both the app/driver or copy settings and the registered cassette size/type. Do not reinstall the driver just to hide that mismatch. 1003 p.936 · 2110 p.968
Paper errors 2110, 2120 and 4103: which setting should you change?
The printer saves its cassette settings separately from the print job. Start with the code shown on the display.
- 2110 — The print or copy settings disagree with the cassette registration. If the cassette contains plain A4 but the app sends A5, cancel and select plain A4 in the app or driver before retrying. If you need A5, load and register A5 instead. Continuing with the loaded paper would apply the A5 settings to the A4 sheet.
- 2120 — Cassette paper registration is incomplete. Check that the size and type shown on the printer match what you loaded. Press OK or the right Function button to finish registering the paper.
- 4103 — The printer cannot use the current print settings. Press Stop on the printer, change the job settings and try again. If you selected automatic duplex in Windows, check that you are using plain A4 or Letter with borderless printing off. If you need to keep photo paper or a different size, try single-sided settings suitable for that paper.
If you just loaded or changed paper, also see cassette loading and registration.
If the Windows print dialog is missing the MG5750 options, see the driver guide for this model.
Canon manuals: 2110 · 2120 · 4103 · Windows duplex printing
When several plain sheets feed at once
Take the plain paper out, square the edges and reload it in portrait orientation, with the print side down. If feeding is unreliable with a full stack, try less than half the load limit. If no sheet feeds and the display shows 1003, start with the cassette loading checks.
If plain sheets keep feeding together, turn on Prevent paper double-feed using whichever of these controls you have:
- Printer panel: Home → Setup → Device settings → Print settings.
- Canon driver on Windows: in the driver setup window, open the Maintenance tab and choose Custom Settings. Select the option and confirm.
- Canon IJ Printer Utility on Mac: open Custom Settings, select the option and apply it. If the utility is unavailable, use the printer panel.
The setting slows printing. Turn it off when the job finishes. If the feeding problem continues, see the roller checks below.
Reviewed 2026-11-13: Canon MG5700 series feed troubleshooting, check 7 · printer panel settings.
Paper-feed rollers: empty cassette, then three plain sheets
Dirty or dusty feed rollers can prevent pickup. First check paper loading, cassette position and matching paper settings; use roller cleaning only when needed because it wears the rollers.
First: without paper
- With the machine powered on, open Setup from HOME.
- Choose Maintenance and press OK; choose Roller cleaning and press OK.
- Confirm Yes with OK.
- At the prompt, empty the cassette and push it back. Press OK for the paper-free rotation.
Then: three plain sheets
- Wait until rotation stops. At the prompt, load three A4 or Letter plain sheets in the cassette.
- Gently open the output tray.
- Press OK; this phase ends after the sheets are discharged.
- Acknowledge the completion message with OK.
Keep the empty and loaded phases in order. If pickup still fails after this procedure, seek Canon service rather than repeating cleaning indefinitely.
Official S508 roller procedure and panel image · Official paper-feed checks
| Case | Next check |
|---|---|
| Feed / jam | Common comparison: check the existing loading and actual jam-path guidance first. |
| Missing nozzle lines | Roller cleaning addresses feeding. Use the separate nozzle pattern and ink-cleaning guidance for missing lines. |
| PC only | Common host comparison: if printer-only output works, compare paper settings, queue and this exact model’s driver. |
Loading · Jam path · Nozzle test · MG5750 drivers
Verified 22 October 2026 against the official MG5700 manual, which explicitly includes MG5750. Earlier driver, connection, alignment and code evidence keeps its dates. S508 and UG003 are manual topic identifiers. No physical cleaning, printing or settings change was performed.
Back-of-paper smudges: bottom-plate cleaning with one folded sheet
This is S509 in the MG5700 online manual that explicitly includes MG5750. Separate dirty paper backs from feed-roller contamination or missing nozzle lines.
- With power on, open Setup from HOME, select Maintenance and press OK.
- Select Bottom plate cleaning and press OK; confirm Yes with OK.
- At the prompt, remove all paper from the cassette and press OK.
- Take one new A4 or Letter plain sheet; fold it in half widthwise, then unfold it.
- Fold one side again so its edge meets the centre crease; unfold it and press OK.
- Load only this sheet in the cassette, crease ridges upward and the edge of the uncreased half toward the far side. Match the official loading diagram below.
- Gently open the output tray and press OK so the sheet feeds through and cleans inside.
- Acknowledge completion with OK and inspect the folded parts of the discharged sheet for ink.
Official procedure, folds and loading diagrams · Cassette orientation diagram

If the folded parts are ink-stained, repeat Bottom Plate Cleaning using a new sheet. Prepare fresh paper each time; do not reinsert the dirty sheet.
If stains remain after repeating
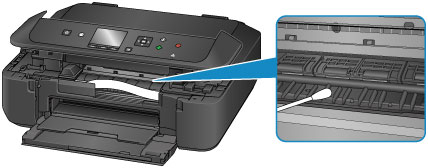
The manual identifies ink on the internal protrusions and allows a cotton swab or similar for that area. Before this manual wiping step, switch off and unplug the power cord. Keep it separate from the powered menu cycle above and use the protrusions shown in the official diagram.
Official protrusion diagram; read the power precaution in the procedure
Choose the next check by symptom
- Back-of-paper smudges: first match paper/quality settings, then use this bottom-plate route. UG021 says borderless, duplex or heavy printing can leave ink inside.
- Failed pickup: the existing feed-roller procedure uses an empty-cassette phase followed by three plain sheets. Keep it separate from this single folded-sheet procedure.
- Missing nozzle lines or PC-only failure: compare the nozzle check and this MG5750 official driver route. These are common comparison checks; a back smudge alone does not establish a driver fault.
Official back-of-paper smudge checks
Verified 25 October 2026. S509 and UG021 identify manual topics, not error codes. Earlier driver, connection, nozzle, alignment and feed-roller evidence keeps its dates. No physical cleaning, printing or settings change was performed.
Print-side scratches and support code 3413
If the printed face is scratched, first match the media type to the loaded paper and check for curl or ripples. If the scratches persist with matching media, Prevent paper abrasion can widen the gap between the print head and the paper.
Use HOME → Setup → Device settings → Print settings → Prevent paper abrasion. Turn it on for the affected job and return it to OFF afterward. It can reduce print speed or quality.
3413 indicates that Prevent paper abrasion is enabled. Choose Yes → OK to continue with the current setting. To turn it off, choose No → OK, then set it to OFF in the menu above.
If ink marks appear on the back of the sheet, see bottom-plate cleaning. If the printer’s nozzle check works but PC jobs never start, check the selected queue and connection, then see the MG5750 driver guide.
Canon code 3413 · Printed-surface scratch checks · Printer panel settings
Code 3413 and paper abrasion checked November 4, 2026.
Automatic duplex errors 1310 and 1304
If the MG5750 stops during two-sided printing, check the support code on its display.
- 1310 points to paper size. Load A4 or Letter and match that size in the application and driver. OK ejects the current sheet and printing resumes on the front of the next one. The ejected sheet has an unprinted back, so check for missing pages before reprinting. Canon’s 1310 instructions
- 1304 means paper jammed during automatic duplex printing. If you can grip the sheet at the output slot, pull it out slowly with both hands, reload the paper and press OK. If it will not come out, avoid forcing it. If you need to turn the printer off, press Stop first, then power it off and unplug it. Follow the transport-unit illustrations in Canon’s 1304 guide. Resend any needed jobs after turning the printer back on.
Windows duplex is grayed out or pauses after the first side · On a Mac, check Two-Sided in the print dialog and match the settings to the paper you loaded. Canon’s duplex checks · Cassette paper settings
When Duplex Printing is unavailable in Windows
If Duplex Printing appears in Canon’s Windows driver but is grayed out, check the paper and layout before reinstalling the driver.
- Test with plain A4 or Letter. Load the paper in the cassette, choose Plain Paper for Media Type on the Main tab, and select the matching size on the Page Setup tab. Keep the paper type set to match what you actually loaded.
- Use a regular document layout. Borderless, Tiling/Poster and Booklet disable Duplex Printing and Stapling Side. Switch to a layout such as Normal-size, then turn on Duplex Printing and Automatic.
- If the back is upside down, change Stapling Side. Pick the edge you want to turn the pages on, then test with a two-page document.
After the first side, wait for the ink to dry. The printer may pause before printing the back. Leave the sheet in place while it waits. If the printer displays a support code, follow the 1310 or 1304 instructions.
If the duplex setting is missing entirely, check the printer selected in the app, then see the MG5750 driver guide for the correct model. Canon’s MG5700 series Windows duplex manual · Official manual checked 2026-11-09.
1300 means the output-slot path
For visible output paper, hold both sides and pull slowly without tearing, then reload and use OK. If printing must be stopped before turning off, press Stop first. Inaccessible or torn paper needs the manual’s transport/interior illustration; the output procedure is not permission to pull every jam through the front. Power-off erases the received job, so resend when ready. 1300 and linked alternate paths p.926
Ink absent, misplaced and exhausted are different
1660 means an absent tank;1680 identifies wrong positions;1681 identifies duplicate tanks of one colour. Check the actual tank/slot, not only the printer-driver name. For1688, replace the exhausted tank and close the operation panel. The manual warns that continuing without ink can damage the machine; a long Stop hold disables remaining-ink detection and is not a driver repair. 1660 p.951 · 1680–1681 pp.952–953 · 1688 p.955
MG5750 automatic head alignment
Use alignment for displaced ruled lines. Missing lines in a nozzle pattern belong to the existing nozzle/cleaning checks. Low ink can spoil the alignment sheet: replace the affected tank first.
- Turn on. Load one A4/Letter plain sheet, white and clean on both sides, in the cassette. Register its size/type on the LCD and open the output tray.
- Choose HOME → Setup → Maintenance → Auto head alignment → Yes, confirming with OK. Inspect the printed pattern before approving its confirmation.
- Keep the printed area clean and uncreased. Place the sheet printed-face-down on the platen, matching its bottom-right mark to the platen alignment mark.
- Close gently and press OK. Leave the cover and sheet undisturbed while it scans. At completion press OK and remove the sheet.
If alignment remains poor, consult the manual’s separate computer-alignment guidance. This panel procedure differs from manual pattern-number entry.
Nozzle check · Cleaning checks · Same-model driver
Official S503 instructions and placement diagram
Verified 20 October 2026: official MG5700-series S503; its model index includes MG5750. Earlier software and wireless evidence retains its original dates.
Use the pattern before cleaning
If the grid/bands have no missing lines or streaks, select All A and avoid needless ink consumption. Otherwise use HOME → Setup → Maintenance → Cleaning → Yes, wait for completion and inspect the new pattern. The manual escalates after two normal cleanings to Deep cleaning. It uses more ink; inspect the relevant colour/tank, and if unresolved turn power off and wait24hours before repeating deep cleaning. Persistent failure needs Canon service. Do not keep running deep cleaning continuously. Cleaning pp.191–192 · Deep-clean escalation pp.193–194
USB checks and an actual wireless report
Common PC checks: sound direct USB data cable, powered device, correct queue/port and first failed job; for wireless use the same approved LAN rather than an isolated guest network. For an actual device report, load two A4/Letter plain sheets, then HOME → Setup → Device settings → LAN settings → Confirm LAN settings → Print LAN details → Yes, using OK. Compare the report’s connection state and SSID with the intended connection. Keep this report private: the manual notes network details and the direct-connection password can be printed. Printing the report does not reset the network. Missing/wrong compatible software returns to MG5750 driver. Network report pp.270–271
MG5750 router Wi-Fi or Direct connection
Choose one wireless mode: The MG5700 online manual explicitly includes MG5750. Router Wi-Fi and Direct connection cannot operate together; changing modes can disconnect existing users. Connection methods
Connect directly only when intended: On the printer use HOME → Setup → Device settings → LAN settings → Change LAN → Activate direct connect. → Yes, confirming with OK. On the device select the printer’s displayed SSID; DIRECT-XXXX-MG5700 series is the manual’s example. Follow the actual password/confirmation prompt and verify the device name on the LCD. Keep credentials private. Exact control-panel steps
Understand the limits: Direct mode allows up to five devices. A sixth needs a free slot. Internet access can stop, or a phone can use billable mobile data. Connected devices cannot communicate with one another through this printer; firmware updates are unavailable in this mode. Direct-mode restrictions
Return to normal router Wi-Fi and check the host
Restore the intended wireless mode: After temporary Direct use, choose HOME → Setup → Device settings → LAN settings → Change LAN → Activate wireless LAN. Disable LAN is a different choice. Reconnect the host to the intended router network. End Direct connection
Check saved auto-connect settings: A device can remember the printer SSID and reconnect automatically. If Internet access disappears again, check the current Wi-Fi network and its auto-connect choice. Coordinate office changes with the network administrator. Saved connection restrictions
Separate connection from software: Common check: compare the actual mode, the existing LAN report and selected printer/scanner. If only PC jobs fail after reconnecting, use this MG5750 driver guide. No factory reset or general firewall disablement is needed for this comparison.
Verified 18 October 2026 from the exact-model setup page and MG5700 HTML manual. No device or network setting was changed. Existing Mac package limits and the eight selected code groups retain their earlier evidence.
Current MP scanning precautions
On2026-10-11, the settled Windows11 list and exact MP detail still show1.02,78MB,released2026-02-18, with IJ Scan Utility and MG5750 in Applicable Models. Its precautions say an OS upgrade can require scanner-driver reinstallation for the device SCAN button; changing network to USB requires MP reinstallation with the actual connection selected. Common checks include the correct scanner/connection and trying IJ Scan Utility separately. Use MG5750 driver for missing components. Listing is not installation or ARM/current Mac/Linux verification. Exact MP requirements and precautions
Do not equate1700 and5B00
1700 reports an absorber nearly full and permits OK to continue while requesting Canon repair.5B00 is stated as a printer error with a service instruction. The selected manual does not prescribe an unofficial service tool, absorber-counter reset or driver reinstall for either repair requirement. Record the code and contact Canon; do not remove the repair need by accepting a counter-reset claim. 1700 p.957 · 5B00 p.992
Evidence checked2026-10-11: exact MG5750 manual mapping, Windows PDF v1.0 released2015-08-21,1026pages; printed pages match PDF positions. Current MP detail is separate evidence; no installer or firmware downloaded/run. Exact model manuals